Thursday, 26 April 2012

Female Design - Costume Development

Well today I have managed to make a lot of progress on my costume, as you can see the garment is taking shape. I found drafting the cape really helpful as afterwards I have been able to adapt the shape on the stand, cutting the length etc.


What has really been the exciting part is the textiles!!

I have totally loved getting back into this again. I feel really back in my element again playing around with textures, colour and machine embroidery.


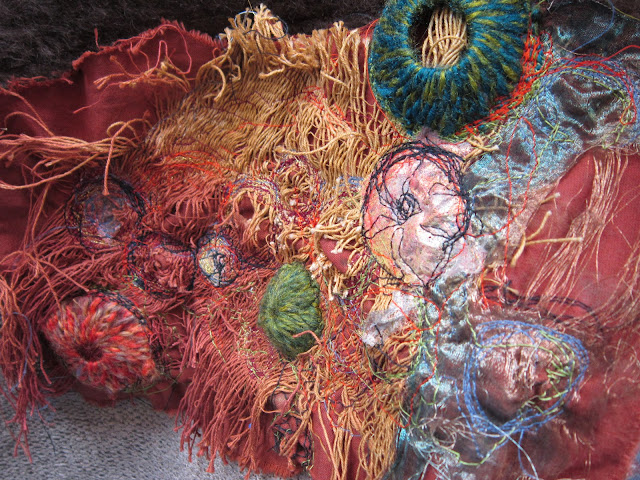
Textiles Patch


It has been really experimental, however the effects seem to really work, using the net, plastics, barnacles, fusible film and other mixed media elements. As a practitioner I have found experimentation and playing around with fabrics and textures really helps bring out your creativity, especially with a project like this.


Base Costume Underneath Cape


Friday, 20 April 2012

Every costume has it's problems....

I have been working on the breeches today for the costume store. Since starting this project I have learnt so much already, especially when it comes to independent learning. I feel far more confident making something now than I have ever done before. I can see clearly each time I make something how much my skills are improving. This week I have finished cutting and mark tacking the breeches and started making the front. This involves heavily hand-sewing and ensuring the pinstripes of my fabric match up. What has been interesting is making a garment in cream and in stripes, as I have never done this before. However I have already found that its so hard keeping it clean!! Even though I have thought my hands are clean Dexter has told me that the fabric is getting dirty so I must wash my hands every 2 hours. Never would I have imagined how hard it would be!

The other pain I have found with this garment is the jiggers, the front two arrows on the front opening. Again due to the cream stripes and the fabric it has been a nightmare trying to keep these visually even and neat with the handsewing. I have felt it has really tested my patience and skills with costume making. Eventually after re-doing them three times I eventually got there. It was a struggle but worth it. I still feel I could have made these even better however due to the overworking of the fabric I felt there was only so many times I could unpick my stitching. At times I do get frustrated as I wish I knew how to do everything first time perfectly and neatly, however I know this will never happen as I am still learning so much, especially when it comes to anything new. From this as a costume maker I have learnt that you are constantly improving and learning and whenever you look back at your work you will still feel that you could have done some things better.

Next week I will hopefully have made more progress and the breeches will look more like a garment!


Wednesday, 18 April 2012

Breathe Club - My Workshop!

This was a great success! As you can see from the photos we had lots of people involved and the demos I did to everyone were very simple, therefore people could pick it up very quickly. It was lovely to socialise whilst work and have a nice fun environment. 


At the end of the session we counted 108 Barnacles had been made that night! This was so helpful for us breathers as we can no start using these in our work and sampling.


The actual process of making a barnacle is very easy. It involves asatate, string or wool and masking tape.

INSTRUCTIONS

1. Cut out a circle shape of asatate.
2. Cut out an inner circle shape from this.
3. Tape donut shape of asatate to that of a cone.
4. Tape down your wool or string to the inside of the cone.
5. Start winding the string around the asatate, creating a buttonhole stitch.


6. Continue this all the way round until the end - knot off and finish!


End Result!

From this workshop I feel more confident when instructing others about how to make something. This will benefit me for the future as I may have to do this when im a profession costume maker.

I am very pleased with the outcome and look forward to next session!

Tuesday, 17 April 2012

History in the Making - Costume Photoshoot!


Final Costume in Photoshoot!


The publicity photoshoot for the Theatre Company! Hopefully more pics will be coming my way!

Wednesday, 11 April 2012

Breathe Club! First Session!

First Breathe together session! It went really well and we were very busy, meeting and greeting new faces and explaining what jobs needed to be done!

I made some of the strips that will be used for the Elder's cloaks which are the costumes I will be based on making. This involved pinning strips of fabric to cord which will be zigzagged stitched together. It was a fun quick process. From the session we made a whole box full with the help we got which was brilliant!

I found it really refreshing being in a costume making atmosphere where I didn't have to worry about fine sewing and perfect stitching, it felt really creative and very social and fun. I am really looking forward to next session as I will be leading a work shop making barnicles, which I learnt how to do from the last project with Battle for the Winds, so it should hopefully be really good! I feel confident teaching new people how to make these and at ease giving demonstrations so it will very fun and light hearted. Role on next Breathe!

Costume Store - 18th Century Breeches

Started the breeches from today onwards. I was given my garment, pattern and fabric, which is a cream cashmere with white cotton lining. The breeches are traditional 18th Century style with the buttoned flap opening at the front, buttoned knee bands and two pockets, one coin one in the waistband and one hand pocket. Dexter explained we had three weeks to make this garment in and that now we are meant to be more independent with our learning and problem solving. He will still teach us and assist us on timetabled sessions however he did say with our pockets in these garments we are going to be given hand outs then decide for ourselves what we should do.

During the rest of the session we cut out our lining pieces and and marked all the patterns. I was working with Naomi who is going to make the waistcoat to match the breeches I'm making. As we are both using the same fabrics we worked together and cut our pieces out economically. This is something I have already learnt with costume - always avoid wastage! It became a bit more tricky with our top fabric as we have stripes. This meant we had to cut our pattern pieces out individually rather than on the fold. Dexter suggested to us to use an Iron when pinning the pieces out to help keep the fabric really flat and pristine. I have never cut out anything in stripes before so this was really interesting. He advised us to draw a line on our lining along the straight of grain and then match this  to one of the stripes in the top fabric pattern with pins. This was a brilliant tip and proved to be successful. The smoothing of the iron removed any air bubbles. I will use this technique now whenever working with any pattern pieces from now on! Gold information!

All I need to do is flat and mark tack my pattern pieces. I shall complete this for next session.


Breeches Front


CF Opening


Coin Pocket


Hand Pocket


Knee-band Opening

Thursday, 5 April 2012

Breathe Project Work - Development


So today we discussed the designs in-depeth a bit more and figured out some ideas for sampling. We were also told by Kate the lead designer that the dance group director looked at the designs and decided that he didn't want the character group called the "Regals", as in Breathe there should be no heir-achy. He changed this to a character group called the "Builders".

Between myself and the other girls working on the Elder cloaks I chose these two designs below:-


I felt that they had real potential with the textile ideas I had in mind. These include the following:-

- Stone Washed Colours
- Bright Colours to contrast - rusts/iridescent?
- Barnacles entwined?
- Plastics = Materials = cling film, carrier bags, mixed media, bubble wrap, ovelocking fabric, asatate sheets, dissolve-able fabric.

Male Design

- Fringing - spaced, painted textured suit jacket

Female Design

- Draped fabric, create pattern and cut to shape of design
- Elastic under the arms
- Trousers - Flap covering the opening

I really wanted to explore the ideas of plastics and textured so I wrote the list of materials I needed from the Breathe group. By next session I should be able to experiment with these and create some exciting textures!

In the meantime I found the jacket I wanted to work with for the male design and started brainstorming some ideas. This included layering up fabrics on-top of one another  to get some inspiration.


I really liked this textural effect of the net on-top of the jacket. I think I can somehow incorporate this into my sampling.

This session has taught me the importance of writing down all of your ideas when problem solving. It really helped me to think out loud and visually see my thought process before jumping in ahead and running straight into making something.

Next session for the Breathe Club we have agreed to make the Barnacles for the cloaks. I will be leading this workshop with Amy. It should be very fun and engaging!